Server Management
NXRefine implements a data reduction workflow, which can be run as a series of line commands in the terminal. However, since some of the processes can take a long time to complete (from a few minutes to an hour, depending on the process and system being used), it is possible to queue these operations using the NXRefine’s queue manager, to be run locally using multiple cores or distributed to other nodes. The NXRefine queue manager can be configured to submit jobs to another job queue manager if one is available.
Server Directory
Every task in the NXRefine workflow is dispatched by Parsl, a Python library for running commands
locally or submitting them to an HPC batch scheduler, so that the same
queue manager code works whether jobs run on the local machine or are
distributed across a cluster. How Parsl is configured for a particular
server, and how to adapt it to different job schedulers, is described in
Parsl Configuration below. Here is the structure of the
nxserver directory:
nxserver
├── nxserver.log
├── nxserver.pid
├── settings.ini
└── task_list
    ├── info
    └── q00000
└── locks
    ├── ...
    └── ...
└── parsl
    ├── task_logs
    │   └── ...
    └── monitoring.db
nxserver.log
This is a log file that records jobs submitted to the server queue.
nxserver.pid
A file containing the process ID of the running server daemon, used to detect whether the server is already running and to stop it.
settings.ini
A file containing default settings used by the NXRefine package, including server parameters, instrumental parameters, and parameters used in the data reduction workflow. When a new experiment is set up, a copy of these parameters is stored in the experiment directory (to be described later), so that they can be customized if necessary. These settings are described below, including the
[parsl]section that configures how jobs are dispatched.
task_list
A directory that contains files that implement a file-based FIFO queuing system for server jobs.
locks
A directory that contains files that implement the nexusformat file-locking system. Locked files can be viewed, and removed if they are stale, using the “Show File Locks” dialog in the NeXpy “File” menu.
parsl
A directory used by Parsl itself, containing one output file pair per dispatched task rather than the fixed set of per-core log files used in earlier versions of NXRefine:
- parsl/task_logs
The standard output and error of every dispatched task, as a
.out/.errpair named after the scan and command it ran, so that each task’s log files can be identified whatever server type is in use.- parsl/monitoring.db
A SQLite database maintained by Parsl’s monitoring system, recording which executor ran each task and when. It is used to annotate the task listing in the “Manage Server” dialog, and is absent when monitoring is disabled, as it always is for the
directserver type.Parsl’s own run-time bookkeeping (its
run_dir) is also kept in this directory alongsidetask_logsandmonitoring.db.
Note
On a multinode server, an optional shell script,
nxqstat.sh, may be placed in the server directory to list
jobs on the underlying scheduler, e.g., qstat -u
$USER. If present, it is run by the “Server Processes”
button in the “Manage Server” and “Manage Workflows” dialogs;
if absent, those dialogs report that the script needs to be
created.
Note
The log files can be viewed using the “Manage Server” dialog and the settings file can be modified using the “Edit Settings” dialog, both of which are located in the “Server” menu in NeXpy.
Default Settings
The file, settings.ini in the server directory contains the default
settings for the server, the beamline, and the workflow. These values
can be changed, either by opening the “Edit Settings” dialog in the
NeXpy “Server” menu or at the command line using nxsettings -i,
which lists all the settings one by one, allowing their values to be
changed. Hitting the [Return] key keeps the current value.
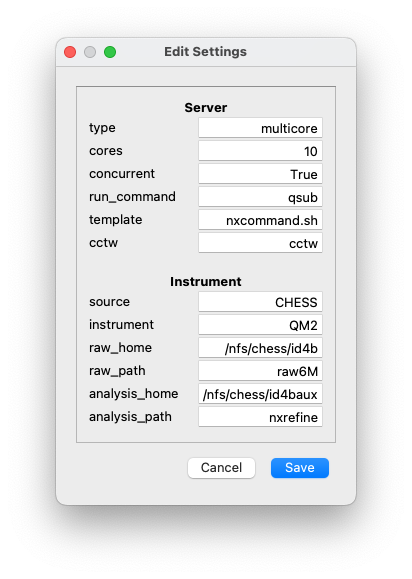
The figure shows an example of the first two sections of
settings.ini. The parameters in the first section are described
here. The other sections contain information concerning the location of
the data and default values of the data reduction parameters. They will
be described later.
Server Settings
The server settings are used by the workflow server, which is described
in a later section. They define the server configuration, such as the
number of simultaneous jobs that may be run and whether parallelized
processes are used within the workflow. How jobs are actually dispatched
to a scheduler, if one is used, is configured separately, in the
[parsl] section described in Parsl Configuration.
- type
The server type can be
direct,multicore, ormultinode. Indirectmode, a task runs immediately in whatever process submits it, normally one of the command-line scripts (nxfind,nxtransform,nxreduce, etc.). This is useful for testing or for a single interactive job, but means that process blocks until the task finishes. Inmulticoreandmultinodemodes, tasks are written to a file queue and dispatched by a server daemon, which allows a task to be queued even while the server is not running. The only difference between the two is thatmultinodejobs are submitted to a batch scheduler by Parsl, rather than run on the local machine; the scheduler itself allocates whichever nodes a job runs on.- cores
This sets the number of jobs that can be run simultaneously by the server. Once reaching the limit, new jobs will only start as old ones are finished. It is not used when the server type is
multinode, where the number of concurrent jobs is instead governed by the[parsl]settings described below.- concurrent
This determines whether parallelized processes should be used in the workflow. These speed up the computation, but can be disabled if they cause issues with the server. Note that this refers to whether multiple processes can be run simultaneously, e.g., in peaks searches, not whether multiple jobs can be submitted to the server. Valid values are
TrueorFalse.- cctw
This is the path to the CCTW executable used to transform data from instrumental coordinates to reciprocal space.
Parsl Configuration
NXRefine dispatches every workflow task — normally a single
nxreduce invocation covering all the entries in a scan — through
Parsl. Parsl is responsible for deciding where and how each task
actually runs: in the current process, as a local subprocess, or as a
job submitted to an HPC batch scheduler. This section describes how that
configuration is built, the [parsl] settings common to every site,
and how sites with different schedulers, including ones not yet
supported, can be added.
How Tasks Are Dispatched
For the direct and multicore server types, tasks are simply run
on the local machine, using as many worker threads or processes as the
cores setting allows. For the multinode server type, Parsl
declares two labelled allocations, a small one and a large one, and each
batch of tasks is routed to whichever is appropriate for its size: small
batches, up to the batch_threshold setting, go to the small
allocation, and larger ones go to the large allocation. This split
exists because HPC schedulers often size their queues very differently
— a handful of nodes with a short wait, versus a large allocation with a
longer wait — and a single workflow may need to submit anywhere from one
scan’s worth of tasks up to a batch covering an entire experiment.
The built-in default configuration submits multinode jobs to a
generic PBS Pro cluster. Sites running a different scheduler, or a PBS
Pro cluster with its own queue policies, select their own configuration
with the config setting, described next.
Parsl Settings
These settings are read from the [parsl] section of
settings.ini. Only config and account are commonly needed
for a multinode site; the rest have defaults suitable for a generic
PBS Pro cluster and only need to be overridden to match local queue
policies.
- config
Names the Python module, or file, that supplies the Parsl configuration. If unset, the built-in generic PBS Pro configuration is used. See Generic Scheduler Support and Site Customizations below.
- account
The project or allocation that submitted jobs should be charged against, if the scheduler requires one.
- walltime
The wall-clock time limit requested for a batch job, as
HH:MM:SS.- small_nodes, large_nodes
The number of nodes requested for the small and large allocations, on schedulers that allocate whole nodes.
- max_blocks
The maximum number of concurrent job submissions (
qsubcalls) allowed for the large allocation. This should be at least the largest batch size divided bylarge_nodes, or excess tasks will wait for a free allocation.- batch_threshold
The number of tasks in a batch at or below which it is routed to the small allocation, rather than the large one.
- cpus_per_node
The number of CPU threads, or SGE slots, requested per node. A single
nxreduceprocess already fills a node, so this should match the hardware, not the size of the workflow.- filesystems
A comma-separated list of filesystem names a PBS Pro job must declare it uses, on systems that require this.
- pe
The name of the SGE parallel environment used to request multiple slots on a single node, for sites running SGE/Grid Engine.
- mem_free
An optional memory request, e.g.,
8G, for sites running SGE/Grid Engine.- worker_init
The name of a shell script, described below, that re-creates the environment on each compute node before tasks run.
- monitoring
Whether Parsl’s monitoring hub, which records task timestamps and status in
monitoring.db, is enabled. Valid values areTrueorFalse; it is always disabled for thedirectserver type.- hub_address
The network address workers should use to reach the monitoring hub, if it cannot be determined automatically from the server’s host name.
- retries
The number of times Parsl should retry a task that fails before giving up on it.
Restoring the Environment on Compute Nodes
Compute nodes do not inherit the environment the server was started in,
so anything a task needs — module loads, the conda environment, and the
NX_SERVER and NX_LOCKDIRECTORY variables — has to be set up again
within the batch job. The worker_init setting names a shell script,
resolved relative to the server directory unless it is given as an
absolute path, that is sourced, not executed, before the workers start,
so that everything it sets is inherited by every task they run:
worker_init = my_setup.sh
The script does not need a shebang line or execute permission, since it
is sourced rather than run directly. On systems that require jobs to
declare the filesystems they use, the filesystem holding this script
must also be named in the filesystems setting. An annotated example,
polaris_setup.sh, is included with the package to be copied into the
server directory and edited; it loads the modules needed to activate a
conda environment and re-exports NX_SERVER and NX_LOCKDIRECTORY.
Generic Scheduler Support
Two scheduler families are supported out of the box, independently of any particular site’s queue policies:
- PBS Pro
The built-in default configuration, used whenever
configis unset, submits jobs to a generic PBS Pro cluster using the[parsl]settings above. A site running PBS Pro with no further requirements can therefore use NXRefine out of the box.- SGE / Grid Engine
Sites running SGE do need a small configuration module of their own, since SGE’s scheduling model differs enough from PBS Pro’s that there is no single set of defaults that fits both — SGE allocates slots on a node via a parallel environment (the
pesetting) rather than whole nodes. A module supplyingget_configandselect_executorfunctions, built on the bundled SGE helper, is enough to support a new SGE site; see the CLASSE configuration below for a worked example.
Site Customizations
Two site-specific configurations are included with NXRefine, each illustrating how a site’s queue policies and cluster quirks are layered on top of the generic scheduler support above:
Polaris, at the Argonne Leadership Computing Facility, runs PBS Pro.
Selecting it with config = nxrefine.parsl.polaris adds the launcher
and GPU declaration Polaris requires to start workers within a
multi-node allocation, works around a Polaris-specific limit on the
length of temporary file paths, and defines a small and a large
allocation sized to match Polaris’s queue policies, so that only
account and a worker_init script need to be supplied.
CLASSE, the Cornell Laboratory for Accelerator-based Sciences and
Education Compute Farm, runs SGE. Selecting it with config =
nxrefine.parsl.classe requests the farm’s parallel environment for
multi-threaded jobs, pins the thread count environment variables so that
a task does not oversubscribe the slots it was granted, and defaults to
the farm’s maximum walltime. The cpus_per_node setting should be set
to match the number of SGE slots needed per nxreduce process on
CLASSE hardware, since the package-wide default reflects Polaris, not
CLASSE.
Both configurations are meant to be starting points as much as they are
site-specific defaults: to adapt either one for another cluster running
the same scheduler, copy the corresponding file into the server
directory, adjust the defaults it hard-codes, such as the queue and
parallel-environment names, and point the config setting at the
copy.
Adding New Schedulers or Sites
The config setting can also name an arbitrary file, e.g., config
= /path/to/my_config.py, so a site can supply a fully custom
configuration without needing to modify NXRefine itself. Such a file
only needs to define the same two functions used internally: one that
builds the Parsl configuration from the [parsl] settings, and one
that chooses which allocation a batch of tasks should run on.
Only PBS Pro and SGE are supported today, but the same layered approach — generic scheduler support beneath site-specific customization — is meant to extend to other schedulers as the need arises, e.g., Slurm or LSF, each added as its own module built around the matching Parsl provider. Sites are welcome to contribute new scheduler or site modules back to NXRefine, rather than maintaining them as private configuration files.
nxserver Command
The server can be started, stopped, and queried from the command line
using nxserver. This is useful for scripts, for starting the server
in an environment where NeXpy is not available, or for integrating
server management into a larger automation workflow.
The positional command argument accepts:
startLaunch the server daemon and begin processing queued tasks.
stopGracefully shut the server down. No new tasks are read from the queue, but the server waits for tasks it has already submitted to finish. With the
-a / --abortoption, the server instead cancels its scheduler allocations and returns unfinished tasks to the queue (see Stopping, Resuming, and Aborting).resumeCancel a
stopthat is still waiting for submitted tasks, so the server returns to normal operation.statusPrint whether the server is running and how many tasks are queued.
clearRemove all pending tasks from the queue without running them.
killImmediately terminate the server process. Jobs already submitted to a batch scheduler are not cancelled.
The -t / --type option selects the execution backend, overriding
the value in settings.ini: direct runs tasks in the calling
process, multicore uses multiple local CPU cores, and multinode
distributes tasks across compute nodes via Parsl (see
Parsl Configuration). The -c / --cores option sets the
number of parallel workers, overriding the cores setting. The
-f / --foreground option runs the server in the current terminal
rather than as a daemon, which is useful for debugging; it can be
stopped in the usual way from another terminal.
usage: nxserver [-h] [-d [DIRECTORY]] [-t TYPE] [-c CORES] [-f] [-a]
                [command]

Launch server for data reduction workflow

positional arguments:
  command               valid commands are: status|start|stop|resume|clear|kill

options:
  -h, --help            show this help message and exit
  -d, --directory [DIRECTORY]
                        Start the server in this directory
  -t, --type TYPE       Server type: multicore|multinode|direct
  -c, --cores CORES     Number of cores
  -f, --foreground      Run the server in this terminal, not as a daemon
  -a, --abort           With stop, cancel queued allocations and requeue
                        unfinished tasks instead of waiting
Server Menu
The NXRefine plugin to NeXpy installs a top-level menu labelled “Server”, which is used to launch and monitor data reduction operations performed as part of the workflow.
Manage Workflows
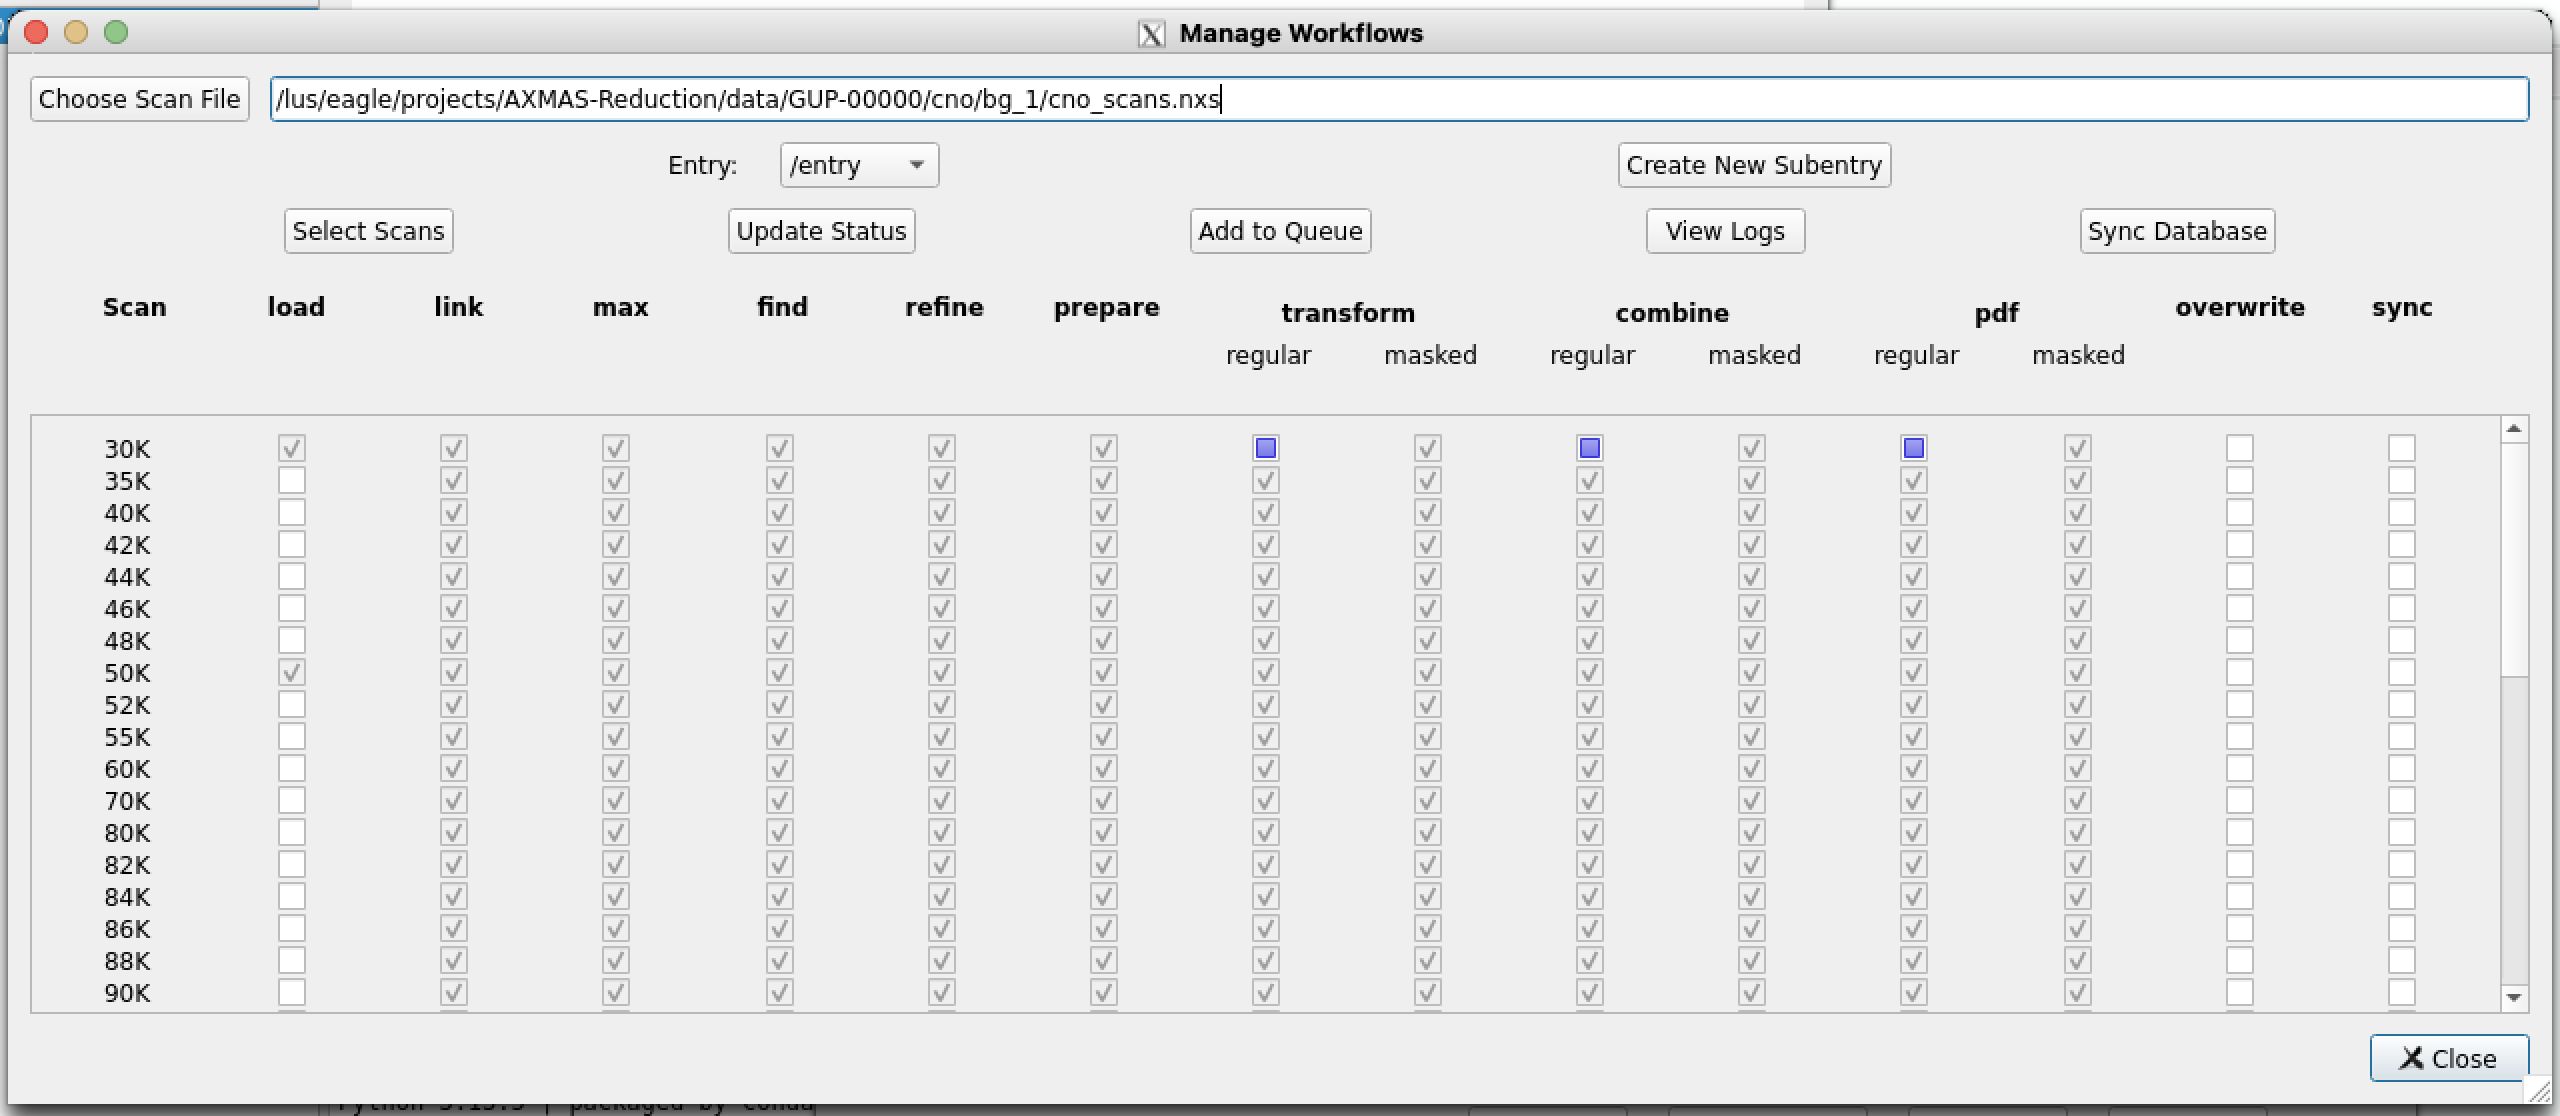
This dialog shows the workflow status for all the scans stored in a particular sample directory, and is the GUI counterpart of the command-line scripts described in Data Reduction. When the dialog is launched, click on “Choose Scan File” to launch the system file browser in order to select one of the NeXus scan files in the sample directory. This opens the “Manage Workflows” dialog, in which the status of every component of the NXRefine workflow is listed for all the scan files in the sample directory. If the sample directory contains more than one analysis entry, the “Entry” selector chooses which one is displayed, and “Create New Subentry” adds another. “Select Scans” restricts the dialog to a subset of the scans, when one has been defined.
Each row of the table is a scan, and each column is a step in the
workflow. Selecting boxes in a row and clicking “Add to Queue” submits
the corresponding commands to the server (see nxserver Command), which
runs them just as if they had been typed at the command line. The tasks
for all the entries of a scan are submitted together as a single
nxreduce command. The checkbox in the “All” row at the bottom of
each column selects or deselects that step for every scan. The other
buttons are “Update Status”, which refreshes the table from the task
database, “View Logs”, which shows the server, workflow and task logs
for a selected scan, entry and step, and “Sync Database”, which is
described below.
Workflow Columns
The columns are listed in the order in which the steps are normally performed. Most correspond to a script described in Data Reduction.
- load
Retrieves or confirms the raw detector data (
nxload).- link
Links the raw data and scan metadata to the wrapper file (
nxlink).- max
Computes the maximum pixel values and frame-level normalization quantities (
nxmax).- find
Searches for Bragg peaks in each entry (
nxfind).- refine
Determines the orientation matrix from the peaks (
nxrefine).- prepare
Builds the three-dimensional mask of Bragg-peak voxels, which is needed for the masked transforms (
nxprepare).- transform
Transforms each entry into reciprocal space (
nxtransform). The “regular” column is the unmasked transform, and the “masked” column is the transform that excludes the Bragg-peak voxels defined byprepare.- combine
Merges the transforms of the entries into a single reciprocal-space map (
nxcombine), again in regular and masked columns.Calculates the 3D-ΔPDF from the combined data (
nxpdf), again in regular and masked columns.
Steps depend on one another. Until a scan’s “load” step has been completed, the “link”, “max”, “find”, “prepare” and “transform” boxes are disabled. When a subentry is selected, the “load” and “link” columns are not shown, since they have been performed for the parent entry. The “combine” and “pdf” steps operate on all the entries of a scan at once. If only these columns are selected for a scan, a single combined command is submitted. Several steps selected for the same scan are run together by a single command, in workflow order.
The last two columns do not correspond to workflow steps. “overwrite” enables every box in a row, including those for completed steps, so that they can be selected and run again, replacing the earlier results. “sync” selects the scan to be updated by “Sync Database”, which re-reads the scan file and resets the task database to match what the file actually contains. It is needed if a file has been modified outside the dialog, e.g., by running scripts from the command line in an environment that does not update the database, or by deleting entries.
Checkbox Colors
Each checkbox shows the state of that step for that scan, as recorded in the task database. The state changes as a task moves through the queue, and is refreshed by “Update Status”, or whenever the dialog is opened.
- Unchecked
The step has not been started. The box can be selected to include it the next time “Add to Queue” is clicked.
- Checked and greyed out
The step is complete. The box is disabled, unless “overwrite” is selected for the scan, in which case it can be selected to run the step again.
- Partially checked, greyed out, no color
The step has just been added to the queue from this dialog. The box is disabled to prevent it from being submitted twice, and the selections are cleared. Click “Update Status” to display its current state.
- Partially checked, blue
The task is in the queue, waiting for the server to run it. Nothing further is needed, but if the server is not running, the task will wait until it is started (see Manage Server).
- Partially checked, green
The task is in progress, i.e., it has been started by the server or by a command-line script.
- Partially checked, red
The task failed. The reason can be found with “View Logs”, after which the box can be selected again to resubmit it.
A partially checked box with a color remains enabled, so a queued, running or failed step can be selected and resubmitted. Clicking it changes it to an ordinary checked box, which will be submitted by “Add to Queue”, and clicking it again restores the earlier color. A blue or green box that does not change for a long time usually means that the task was interrupted without being recorded as failed, e.g., because the server was killed (see Stopping, Resuming, and Aborting). In that case, use “Sync Database” to reset the status of the scan, and then resubmit the task.
Manage Server
This dialog, titled “Manage Servers”, allows the status of the server to
be monitored and controlled. “Server Log” lists the server’s own log,
and every recently dispatched task, so that individual tasks’ output can
be inspected without leaving NeXpy. “Server Queue” lists the tasks
waiting to be dispatched, which can be discarded with “Clear Queue”.
“Server Processes” lists currently running jobs, using nxqstat.sh
(see Server Directory) on a multinode server, or a filtered
process list on direct and multicore servers. If nxqstat.sh
does not exist, a multinode server lists the user’s scheduler jobs
whose names contain “parsl”, which includes any left behind by a server
that was killed. “Server Locks” and “Clear Locks” show and remove file
locks.
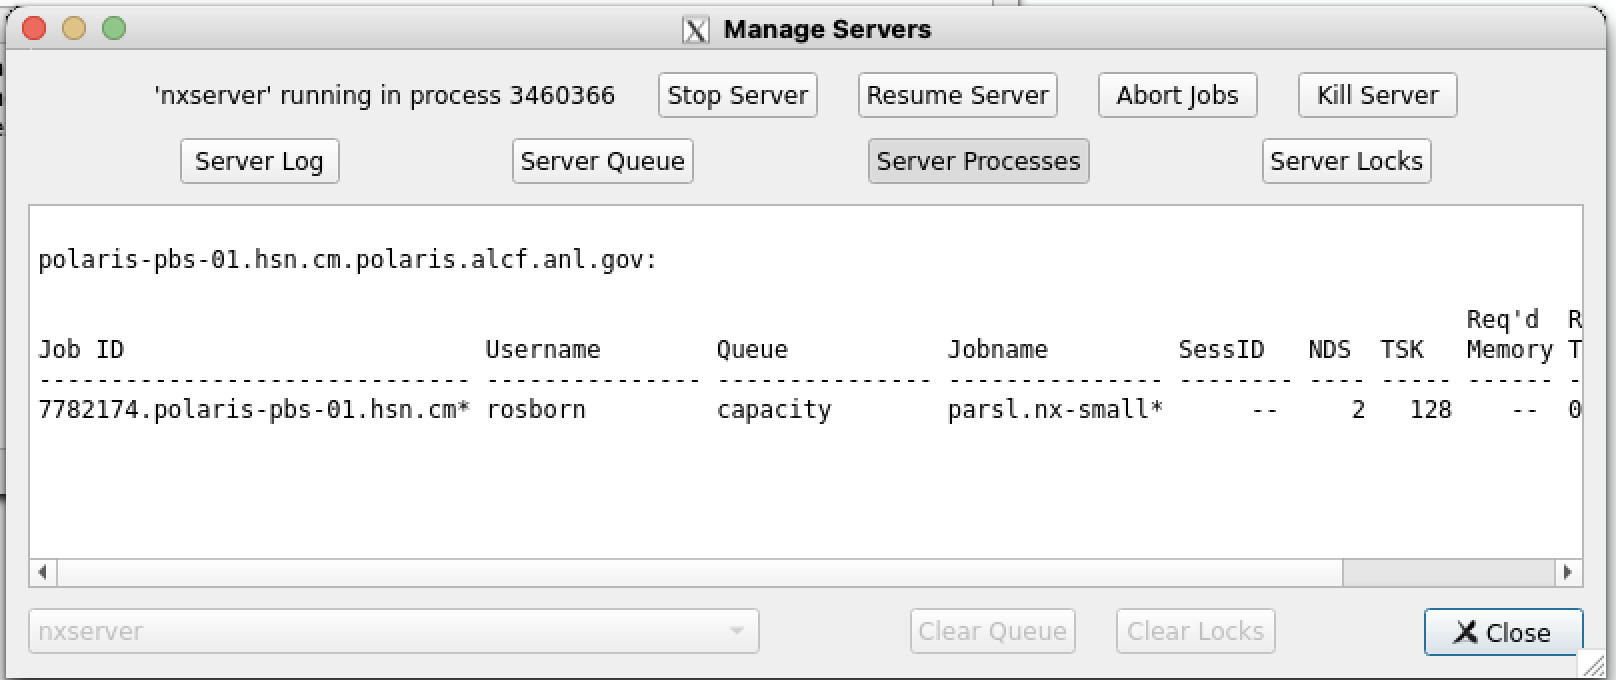
The top row of the dialog shows the server status and the buttons that control it. “Start Server” and “Stop Server” share a single button, which shows whichever action is currently applicable. The other three buttons are enabled whenever a server process is recorded, even if it was started on a different login node, since all nodes share the same queue.
Stopping, Resuming, and Aborting
The four server control buttons correspond to increasingly forceful ways of ending a server, and to one way of reversing a stop. Each is also available from the command line (see nxserver Command).
- Stop Server (
nxserver stop) This is the normal way to shut a server down. The server reads no further tasks from the queue, waits for the tasks it has already submitted to finish, and then exits. On a
multinodeserver, a submitted task may be waiting in the scheduler’s queue for an allocation, so a stop can take a long time, or never complete if the allocation is never granted. While it is waiting, the server still reads the queue, which is what allows the following three buttons to work.- Resume Server (
nxserver resume) Use this to cancel a stop that is still waiting for submitted tasks, e.g., if the stop was requested by mistake or more work has been queued that should not wait for a restart. The server goes back to dispatching tasks, and any allocations already requested from the scheduler are left in place. It has no effect on a server that is not stopping, and cannot revive one that has already exited; use “Start Server” in that case.
- Abort Jobs (
nxserver stop --abort) Use this when a stop is not completing, e.g., because the scheduler has not started an allocation, or when running or queued jobs need to be cancelled immediately. The server cancels its scheduler allocations, returns all unfinished tasks to the queue, and then exits. Because a task that was running when it was cancelled is lost, it will be run again when the server is restarted; this is safe, since each step of the workflow skips whatever has already been processed. The dialog asks for confirmation first.
- Kill Server (
nxserver kill) Use this as a last resort, when the server process is unresponsive and does not respond to a stop or abort. It terminates the server process immediately and does not give it the chance to clean up. Jobs that have already been submitted to the scheduler are not cancelled, and are orphaned. They can be seen in “Server Processes” and removed with the scheduler’s own commands (e.g.,
qdel), or it is better to use “Abort Jobs” first if the server is still responsive. The dialog asks for confirmation first.
Note
A direct server has no daemon, so these buttons apply
only to multicore and multinode servers. Closing the
dialog stops a direct server.